지난 포스팅에는 각각의 선택이 진행되어야 하는 checkbutton을 확인했다면,
오늘 포스팅은 여러개 중 하나를 선택하는 경우에 사용되는 radiobutton을 확인해 볼 예정입니다.
1. radiobutton 기본 설정
from tkinter import *
import tkinter.messagebox as msb
from tkinter import filedialog # 파일 open 기능 사용
root = Tk()
root.title('To올라운드의 알찬 GUI 강의')
def get_checkbutton_stat():
print(f'check1 의 상태 : {check1_value.get()}')
print(f'check2 의 상태 : {check2_value.get()}')
print(f'check3 의 상태 : {check3_value.get()}')
def get_radiobutton_stat():
print(f'radiobutton 의 상태 : {age_group_value.get()}')
root.geometry("300x500") # 가로 X 세로 / 대문자X 하면 실행안됨
#msb.showinfo('Welcome','안녕하세요. To올라운더와 함께 하는 GUI입니다.')
body_frame = Frame(root, relief='solid', bd=2, background='orange', padx=5, pady=5)
body_frame.pack(fill='both', expand=True)
check1_value = IntVar()
check1_btn = Checkbutton(body_frame, text='문자 보내기', variable=check1_value)
check1_btn.pack()
check2_value = IntVar()
check2_btn = Checkbutton(body_frame, text='SNS 보내기', variable=check2_value)
check2_btn.pack()
check3_value = IntVar()
check3_btn = Checkbutton(body_frame, text='메일 보내기', variable=check3_value)
check3_btn.pack()
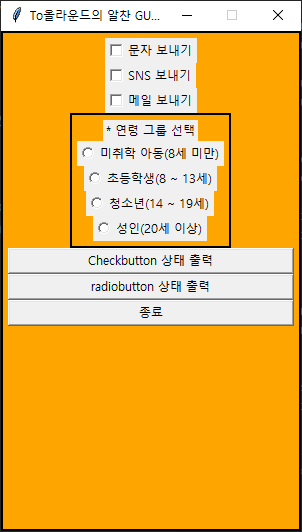
age_group_frame = Frame(body_frame, relief='solid', bd=2, background='orange', padx=5, pady=5)
age_group_frame.pack()
age_group_label = Label(age_group_frame, text='* 연령 그룹 선택')
age_group_label.pack()
age_group_value = IntVar()
age_group1 = Radiobutton(age_group_frame, text='미취학 아동(8세 미만)', value=1, variable=age_group_value)
age_group1.pack()
age_group2 = Radiobutton(age_group_frame, text='초등학생(8 ~ 13세)', value=2, variable=age_group_value)
age_group2.pack()
age_group3 = Radiobutton(age_group_frame, text='청소년(14 ~ 19세)', value=3, variable=age_group_value)
age_group3.pack()
age_group4 = Radiobutton(age_group_frame, text='성인(20세 이상)', value=4, variable=age_group_value)
age_group4.pack()
get_checkbutton_stat_btn = Button(body_frame, text ='Checkbutton 상태 출력', command=get_checkbutton_stat)
get_checkbutton_stat_btn.pack(fill='x')
get_radiobutton_stat_btn = Button(body_frame, text ='radiobutton 상태 출력', command=get_radiobutton_stat)
get_radiobutton_stat_btn.pack(fill='x')
quit_btn = Button(body_frame, text='종료', command=quit)
quit_btn.pack(fill='x')
root.resizable(False,False) # x너비, y 변경 허용 여부
root.mainloop()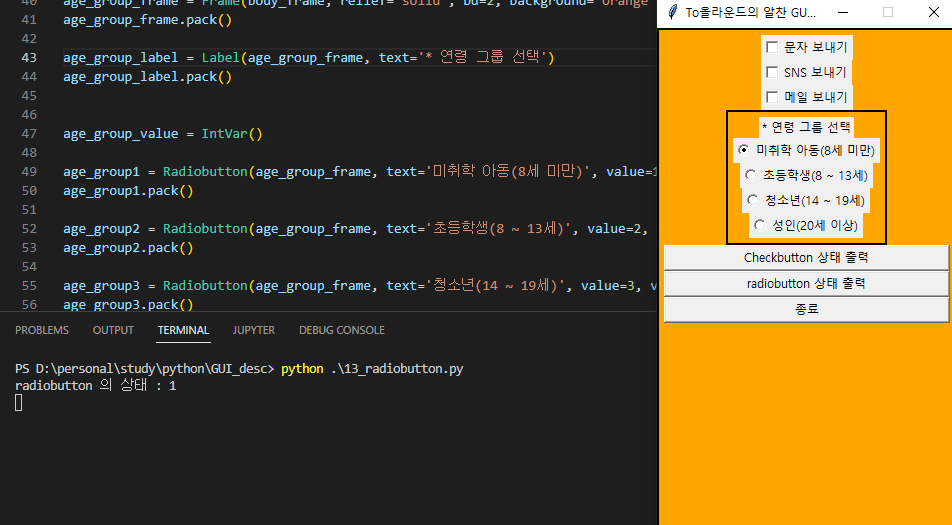
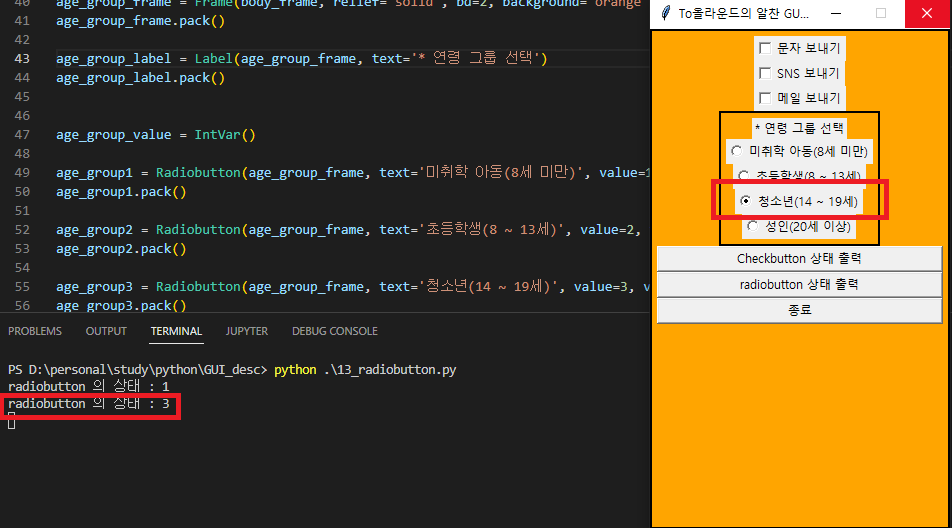
- 지난 시간에 배운 checkbutton과 비교하기 위해 해당 코드에 내용을 추가하였습니다.
- 개별로 선택이 가능한 checkbutton과 달리 radiobutton은 하나를 선택하면
해당 그룹에 있는 다른 button은 선택되지 않는 것을 볼 수 있습니다.
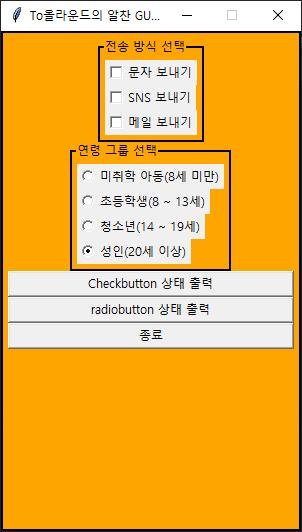
2. 코드 보완 하기(+LabelFrame, 기본 값 설정)
- 위의 코드를 보면 40라인에 age_group_frame 을 생성하고, 해당 Frame 안에
해당 내용을 설명하는 age_group_label 과 radiobutton이 추가된 것을 볼 수 있습니다.
- 제목과도 같은 Label의 위치가 Radiobutton과 같아 제목이라는 느낌이 조금 부족한데,
이럴 때 LabelFrame을 적용하면 좀 더 자연스러운 GUI를 구성하실 수 있습니다.
- 마지막으로 radiobutton을 기본 선택하기 위해서 해당 value값을 지정할 수 있다.
방법은 66라인처럼 상태변수.set(value=변수 값) 을 지정해주면된다.
from tkinter import *
import tkinter.messagebox as msb
from tkinter import filedialog # 파일 open 기능 사용

root = Tk()
root.title('To올라운드의 알찬 GUI 강의')

def get_checkbutton_stat():
    print(f'check1 의 상태 : {check1_value.get()}')
    print(f'check2 의 상태 : {check2_value.get()}')
    print(f'check3 의 상태 : {check3_value.get()}')

def get_radiobutton_stat():
    print(f'radiobutton 의 상태 : {age_group_value.get()}')


root.geometry("300x500") # 가로 X 세로 / 대문자X 하면 실행안됨

#msb.showinfo('Welcome','안녕하세요. To올라운더와 함께 하는 GUI입니다.')

body_frame = Frame(root, relief='solid', bd=2, background='orange', padx=5, pady=5)
body_frame.pack(fill='both', expand=True)

send_method_labelframe = LabelFrame(body_frame, text='전송 방식 선택', relief='solid', bd=2, background='orange', padx=5, pady=5)
send_method_labelframe.pack()

check1_value = IntVar()
check1_btn = Checkbutton(send_method_labelframe, text='문자 보내기', variable=check1_value)
check1_btn.pack()


check2_value = IntVar()
check2_btn = Checkbutton(send_method_labelframe, text='SNS 보내기', variable=check2_value)
check2_btn.pack()


check3_value = IntVar()
check3_btn = Checkbutton(send_method_labelframe, text='메일 보내기', variable=check3_value)
check3_btn.pack()


# age_group_frame = Frame(body_frame, relief='solid', bd=2, background='orange', padx=5, pady=5)
# age_group_frame.pack()

# age_group_label = Label(age_group_frame, text='* 연령 그룹 선택')
# age_group_label.pack()

age_group_labelframe = LabelFrame(body_frame, text='연령 그룹 선택', relief='solid', bd=2, background='orange', padx=5, pady=5)
age_group_labelframe.pack()

age_group_value = IntVar()

age_group1 = Radiobutton(age_group_labelframe, text='미취학 아동(8세 미만)', value=1, variable=age_group_value)
age_group1.pack(anchor='nw')

age_group2 = Radiobutton(age_group_labelframe, text='초등학생(8 ~ 13세)', value=2, variable=age_group_value)
age_group2.pack(anchor='nw')

age_group3 = Radiobutton(age_group_labelframe, text='청소년(14 ~ 19세)', value=3, variable=age_group_value)
age_group3.pack(anchor='nw')

age_group4 = Radiobutton(age_group_labelframe, text='성인(20세 이상)', value=4, variable=age_group_value)
age_group4.pack(anchor='nw')

age_group_value.set(value=4) # radiobutton 기본 값 설정


get_checkbutton_stat_btn = Button(body_frame, text ='Checkbutton 상태 출력', command=get_checkbutton_stat)
get_checkbutton_stat_btn.pack(fill='x')

get_radiobutton_stat_btn = Button(body_frame, text ='radiobutton 상태 출력', command=get_radiobutton_stat)
get_radiobutton_stat_btn.pack(fill='x')


quit_btn = Button(body_frame, text='종료', command=quit)
quit_btn.pack(fill='x')


root.resizable(False,False) # x너비, y 변경 허용 여부
root.mainloop()
- LabelFrame 적용 전, 후를 비교해보면 훨씬 눈에 가시적으로 구별되는 것을 볼 수 있다.
(* 해당 영역에 background 색을 orange로 적용하는 이유는
미관상 어색하나, 교육의 이해를 돕기 위해 다른 Frame이나 Label 영역의 경계를 보여드리기 위함입니다.
해당 파라미터를 제거하시면 전체 배경이 회색 계열의 자연스러운 기본 색상으로 설정됩니다.)
'Python > GUI(tkinter)' 카테고리의 다른 글
| 독학 Python tkinter(GUI) - 16.photoimage(+PIL) (0) | 2023.11.14 |
|---|---|
| 독학 Python tkinter(GUI) - 15.Combobox (0) | 2023.11.13 |
| 독학 Python tkinter(GUI) - 13.checkbutton (0) | 2023.11.11 |
| 독학 Python tkinter(GUI) - 12.Text(+scrollbar) (0) | 2023.11.10 |
| 독학 Python tkinter(GUI) - 11.Entry2(+filedialog) (1) | 2023.11.09 |


