Button은 번역을 하면 더 난해한 느낌이 드는, 메소드나 함수 등을 실행시키는 단추이다.
그래서 설명보다는 원래 자신이 알던 이미지를 떠올리는게 더 정답이라고 생각한다.
예를 들면 해당 버튼을 누르면 뭔가 진행되거나 실행된다는건 다들 겪어 본 일들일 거라 생각한다.
1. Button(버튼)만들기
- 만드는 방법은 Label을 만드는 방법과 크게 다르지 않다.
- 대신 위에 언급한 바와 같이 어떤 동작을 실행시킬 수 있는 command를 지정할 수 있다는게 가장 큰 특징이다.
2. 코드
from tkinter import *

root = Tk()
root.title('To올라운드의 알찬 GUI 강의')


root.geometry("200x300") # 가로 X 세로 / 대문자X 하면 실행안됨


body_frame = Frame(root, relief='solid', bd=2, background='orange', padx=5, pady=5)
body_frame.pack(fill='both', expand=True)


plus_button = Button(body_frame, text='1씩 증가')
plus_button.pack(fill='x', expand=True)


root.resizable(False,False) # x너비, y 변경 허용 여부
root.mainloop()
- 단순히 버튼을 만드는 건 Label과 동일하다.
- 이제 중요한 command를 추가해보겠다.
- count 라는 변수를 하나 생성한 뒤, 1씩 증가하는 count_plus라는 함수를 만들어보면
from tkinter import *

root = Tk()
root.title('To올라운드의 알찬 GUI 강의')


root.geometry("200x300") # 가로 X 세로 / 대문자X 하면 실행안됨

count = 0

def count_plus():
    global count
    count += 1
    print(count)


body_frame = Frame(root, relief='solid', bd=2, background='orange', padx=5, pady=5)
body_frame.pack(fill='both', expand=True)


plus_button = Button(body_frame, text='1씩 증가', command=count_plus)
plus_button.pack(fill='x', expand=True)


root.resizable(False,False) # x너비, y 변경 허용 여부
root.mainloop()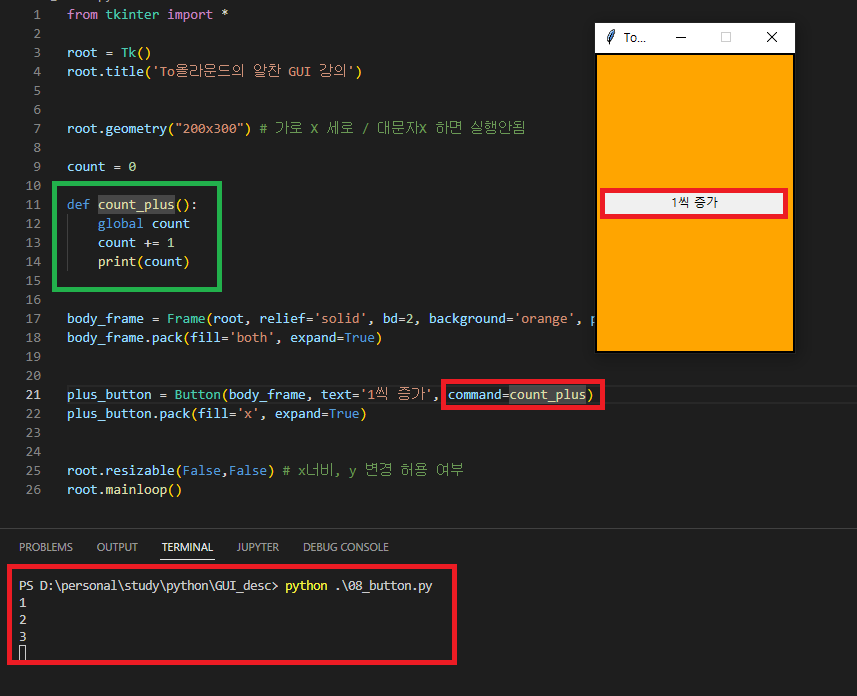
위와 같이 코드를 작성할 수 있는데, [command = 함수명] 을 넣어주면 되고, GUI 상의 '1씩 증가' 버튼을 누를 때 마다
아래쪽 터미널 창에 숫자가 증가하는 모습을 볼 수 있다.
- 관심 있게 보아야할 것은 함수 내에 사용된 global count 인데, 전역변수와 지역변수에 대해 알아보면
해당 키워드를 왜 사용하는지 자세히 알 수 있다.
(해당 함수에서 global count 가 없으면 count 라는 변수가 지정되지 않았다는 오류가 발생한다.)
3. Button 활용하기
- 하지만 우리는 단순히 터미널에서만 보고 만족하지 못한다. 이전 시간에 배운 Label과 조합을 해보자.
- 이때까지는 Label을 선언을 한뒤 수정하지 않았지만,
config 메서드를 통해 Label을 변경할 수 있다.
from tkinter import *

root = Tk()
root.title('To올라운드의 알찬 GUI 강의')


root.geometry("200x300") # 가로 X 세로 / 대문자X 하면 실행안됨

count = 0

def count_plus():
    global count
    count += 1
    print(count)

    result_label.config(text=f'결과 값 출력 : {count}')


body_frame = Frame(root, relief='solid', bd=2, background='orange', padx=5, pady=5)
body_frame.pack(fill='both', expand=True)


plus_button = Button(body_frame, text='1씩 증가', command=count_plus)
plus_button.pack(fill='x', expand=True)


result_label = Label(body_frame, text='결과 값 출력 : ')
result_label.pack(fill='x', expand=True)

root.resizable(False,False) # x너비, y 변경 허용 여부
root.mainloop()
- result_label 이라는 Label 요소를 추가하면 프로그램을 처음 실행한 초기 값에는 '결과 값 출력 : ' 이라는 텍스트만 나타난다.
- count_plus() 메서드 내에 result_label.config 로 text 값을 수정하면, 버튼을 누를 때 마다 기존에 터미널 뿐아니라 GUI 상에서도 값이 증가되는 것을 볼 수 있다.
(*text 값에 입력된 f'' 의 의미를 모르신다면 python 포멧팅(f string)에 대해 알아보면 도움이 됩니다.)


- 마지막으로 증가 뿐 아니라 감소하는 함수도 추가해보겠습니다.
from tkinter import *

root = Tk()
root.title('To올라운드의 알찬 GUI 강의')


root.geometry("200x300") # 가로 X 세로 / 대문자X 하면 실행안됨

count = 0

def count_plus():
    global count
    count += 1
    print(count)

    result_label.config(text=f'결과 값 출력 : {count}')


def count_minus():
    global count
    count -= 1
    result_label.config(text=f'결과 값 출력 : {count}')

body_frame = Frame(root, relief='solid', bd=2, background='orange', padx=5, pady=5)
body_frame.pack(fill='both', expand=True)


plus_button = Button(body_frame, text='1씩 증가', command=count_plus)
plus_button.pack(fill='x', expand=True)

minus_button = Button(body_frame, text='1씩 감소', command=count_minus)
minus_button.pack(fill='x', expand=True)

result_label = Label(body_frame, text='결과 값 출력 : ')
result_label.pack(fill='x', expand=True)

root.resizable(False,False) # x너비, y 변경 허용 여부
root.mainloop()
- Label과 Button 만으로도 GUI의 50% 이상을 만들 수 있다.
- 다음 시간에 배울 Entry나 Text까지 배운다면 80% 이상을 배웠다고 해도 과하지 않다.
- 하지만 유용한 기능들이 몇가지 더 있으니 꼭 끝까지 진행해보자.
'Python > GUI(tkinter)' 카테고리의 다른 글
| 독학 Python tkinter(GUI) - 10.Entry1 (0) | 2023.11.08 |
|---|---|
| 독학 Python tkinter(GUI) - 09.MessageBox (0) | 2023.11.07 |
| 독학 Python tkinter(GUI) - 07.place (0) | 2023.11.05 |
| 독학 Python tkinter(GUI) - 06.grid (1) | 2023.11.04 |
| 독학 Python tkinter(GUI) - 05.pack (1) | 2023.11.03 |


