일반적인 프로그램을 사용하다 보면,
잘못된 입력이나 동작을 했을 때, 경고나 알림을 주는 여러 메세지들을 봤을 것이다.
우리가 작성하는 프로그램도 이런 종류의 메세지를 통해
사용자에게 정보를 제공하거나 오류를 수정하도록 유도할 수 있는데,
오늘은 메세지에 대해 알아보려한다.
1. 살짝 맛보기
- 메세지창을 띄우기 위해서는 tkinter.messagebox 라이브러리가 필요하다.
- 메세지 박스의 경우 사용 빈도가 생각보다 높아 alias(약칭/별명) 을 설정해두면 훨씬 편리하다.
- 2라인과 같이 라이브러리를 호출한 뒤
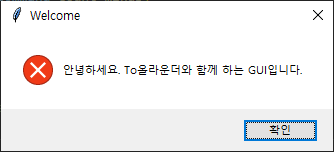
지난 시간에 사용한 버튼 코드에 'msb.showinfo ~~ ' 를 추가해주면 프로그램이 시작될 때
다음과 같은 메세지 창이 나타난다.
- 사용방법은 msb.showinfo(title, text) 내용이다.
from tkinter import *
import tkinter.messagebox as msb

root = Tk()
root.title('To올라운드의 알찬 GUI 강의')


root.geometry("200x300") # 가로 X 세로 / 대문자X 하면 실행안됨

count = 0

def count_plus():
    global count
    count += 1
    print(count)

    result_label.config(text=f'결과 값 출력 : {count}')


def count_minus():
    global count
    count -= 1
    result_label.config(text=f'결과 값 출력 : {count}')


body_frame = Frame(root, relief='solid', bd=2, background='orange', padx=5, pady=5)
body_frame.pack(fill='both', expand=True)

msb.showinfo('Welcome','안녕하세요. To올라운더와 함께 하는 GUI입니다.')


plus_button = Button(body_frame, text='1씩 증가', command=count_plus)
plus_button.pack(fill='x', expand=True)

minus_button = Button(body_frame, text='1씩 감소', command=count_minus)
minus_button.pack(fill='x', expand=True)

result_label = Label(body_frame, text='결과 값 출력 : ')
result_label.pack(fill='x', expand=True)

root.resizable(False,False) # x너비, y 변경 허용 여부
root.mainloop()
2. 자세히 알아보기
1) 단순 알림(show ~)
- messagebox에는 showinfo 외에도 warning과 error가 있는데, 각각 사용방법은 동일하고,
나타나는 아이콘이 다르게 나타난다.
from tkinter import *
import tkinter.messagebox as msb

msb.showinfo('Welcome','안녕하세요. To올라운더와 함께 하는 GUI입니다.')
msb.showerror('Welcome','안녕하세요. To올라운더와 함께 하는 GUI입니다.')
msb.showwarning('Welcome','안녕하세요. To올라운더와 함께 하는 GUI입니다.')| msb.showinfo('Welcome','안녕하세요. To올라운더와 함께 하는 GUI입니다.') | msb.showerror('Welcome','안녕하세요. To올라운더와 함께 하는 GUI입니다.') | msb.showwarning('Welcome','안녕하세요. To올라운더와 함께 하는 GUI입니다.') |
 |
 |
 |
- 사용방법은 동일하나 호출되는 메서드에 따라 아이콘 모양이 달라진다.
2) 선택창 (ask ~ )
from tkinter import *
import tkinter.messagebox as msb

msb.askretrycancel('askretrycancle', 'retry / cancel 을 선택 할 수 있어요.')
msb.askokcancel('askokcancel', 'ok / cancle 을 선택 할 수 있어요.')
msb.askretrycancel('askretrycancel', 'retry / cancel 을 선택 할 수 있어요.')
msb.askyesno('askyesno', 'yes / no  을 선택 할 수 있어요.')
msb.askyesnocancel('askyesnocancel', 'yes / no / cancel 을 선택 할 수 있어요.')
- 위의 코드를 실행해보면, 아래와 같은 5개의 팝업창을 확인할 수 있다.
| 메서드 | 실행창 | 리턴 값 |
| askquestion |  |
Yes / No |
| askokcancel | 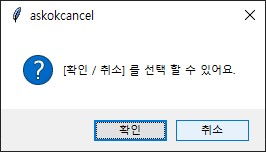 |
True / False |
| askretrycancel | 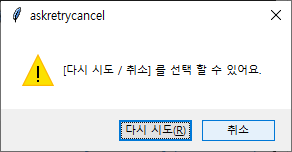 |
True / False |
| askyesno |  |
True / False |
| askyesnocancel | 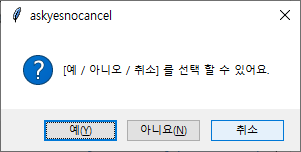 |
True / False / None |
- 사용해야 하는 용도에 따라 버튼이 2개 또는 3개로 나타나는데,
단순히 버튼의 생겼다는 의미로 끝날것이 아니라
우리는 사용자가 선택한 값을 활용할 수 있는 방법이 생겼다는 의미이다.
- 위의 표에서 리턴 값이라고 표시한 부분인데, 사용자가 어떤 버튼을 눌렀는지
변수로 받아보면 이를 통해 사용자의 입력에 따라 결과를 진행할 수 있다.
- 예를 들어 askyesnocancel을 이용하여 결과 값을 먼저 변수로 받아보고
'예'일 때는 count를 증가하는 count_plus 함수를
'아니오' 일 때는 count를 감소하는 conunt_minus 함수를
'취소' 일 때는 반복문을 종료하는 함수를 만들어보겠다.
- 테스트는 askyesnocancel 의 값을 ask_result 변수로 받고 5회 동안 반복동작하도록 작성되어 있는데,
예, 아니오, 취소 에 따라서 결과 값이 True, False, None 으로 나타나는 것을 볼 수 있다.
from tkinter import *
import tkinter.messagebox as msb

root = Tk()
root.title('To올라운드의 알찬 GUI 강의')


root.geometry("200x300") # 가로 X 세로 / 대문자X 하면 실행안됨

count = 0

def count_plus():
    global count
    count += 1
    print(count)

    result_label.config(text=f'결과 값 출력 : {count}')


def count_minus():
    global count
    count -= 1
    result_label.config(text=f'결과 값 출력 : {count}')


body_frame = Frame(root, relief='solid', bd=2, background='orange', padx=5, pady=5)
body_frame.pack(fill='both', expand=True)

msb.showinfo('Welcome','안녕하세요. To올라운더와 함께 하는 GUI입니다.')


# plus_button = Button(body_frame, text='1씩 증가', command=count_plus)
# plus_button.pack(fill='x', expand=True)

# minus_button = Button(body_frame, text='1씩 감소', command=count_minus)
# minus_button.pack(fill='x', expand=True)

result_label = Label(body_frame, text='결과 값 출력 : ')
result_label.pack(fill='x', expand=True)

retry_count =1
while retry_count < 5:
    ask_result = msb.askyesnocancel('증가 / 감소', '[예]를 누르면 count가 증가,[아니오]를 누르면 count가 감소합니다.\n[취소]를 누르면 프로그램이 종료됩니다.' )
    print(type(ask_result))
    print(f'결과 값 : {ask_result}')
    retry_count += 1

root.resizable(False,False) # x너비, y 변경 허용 여부
root.mainloop()
3. 조건문 추가 작성하기
from tkinter import *
import tkinter.messagebox as msb

root = Tk()
root.title('To올라운드의 알찬 GUI 강의')


root.geometry("200x300") # 가로 X 세로 / 대문자X 하면 실행안됨

count = 0

def count_plus():
    global count
    count += 1
    print(count)

    result_label.config(text=f'결과 값 출력 : {count}')


def count_minus():
    global count
    count -= 1
    print(count)

    result_label.config(text=f'결과 값 출력 : {count}')


body_frame = Frame(root, relief='solid', bd=2, background='orange', padx=5, pady=5)
body_frame.pack(fill='both', expand=True)

msb.showinfo('Welcome','안녕하세요. To올라운더와 함께 하는 GUI입니다.')


# plus_button = Button(body_frame, text='1씩 증가', command=count_plus)
# plus_button.pack(fill='x', expand=True)

# minus_button = Button(body_frame, text='1씩 감소', command=count_minus)
# minus_button.pack(fill='x', expand=True)

result_label = Label(body_frame, text='결과 값 출력 : ')
result_label.pack(fill='x', expand=True)

retry_count =1
while retry_count < 10:
    ask_result = msb.askyesnocancel('증가 / 감소', f'입력이 {10-retry_count}회 남았습니다.\n[예]를 누르면 count가 증가,[아니오]를 누르면 count가 감소합니다.\n[취소]를 누르면 프로그램이 종료됩니다.' )

    if ask_result == True:
        count_plus()
    elif ask_result == False:
        count_minus()
    elif ask_result == None:
        print('아무런 동작이 없습니다.')
        pass

    retry_count += 1

root.resizable(False,False) # x너비, y 변경 허용 여부
root.mainloop()
- 위에서 본 내용처럼 사용자가 선택하는 버튼을 통해 원하는 기능을 적용할 수 있다는 것을 확인할 수 있다.
조금 과장하면,
우리는 이제 User(사용자)와 소통이 가능한 프로그램을 만드는 개발자이다!!
'Python > GUI(tkinter)' 카테고리의 다른 글
| 독학 Python tkinter(GUI) - 11.Entry2(+filedialog) (1) | 2023.11.09 |
|---|---|
| 독학 Python tkinter(GUI) - 10.Entry1 (0) | 2023.11.08 |
| 독학 Python tkinter(GUI) - 08.Button (0) | 2023.11.06 |
| 독학 Python tkinter(GUI) - 07.place (0) | 2023.11.05 |
| 독학 Python tkinter(GUI) - 06.grid (1) | 2023.11.04 |


